The Carthaginian army I’ve been working on has been finished. the 600 point force is now able to match the Mid-Republic Roman force I painted a while back on the tale. I love the site of two fully painted forces, especially if I did both of them.
-

- The full force.

-

- Maharbal, Hannibal, and Mago.
This is the finished force, with Hannibal, Maharbal, and Mago in command, leading 2 units of African Spear x6, Gallic Foot x8, Gallic Cavalry x4, Spanish Scutarii x6, Spanish Cavalry x4, 2 units of Numidian Light Horse x4, Numidian Javelinmen x6, Balaeric Slingers x4, Elephants x2, and the camp. The extra unit of Libyan Javelinmen x6 and a couple more stands of Balaeric Slingers are included.
-

- Gallic Foot, Cavalry, with Libyan Javelinmen in front.
-

- African Spear with Numidian and Balaeric skirmishers. Elephants bringing up the rear.
-

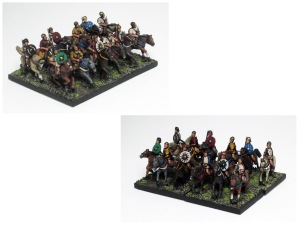
- Numidian Light Horse and Spanish Cavalry.
To commemorate the completion of the army, we played a game (what else?). I played as the Romans and the owner of the two armies played Carthage.
We played somewhere in the foothills of Italy. The field had a series of low and steep hills on the left side (brown and dark brown terrain respectively), with fields and vineyards on the right (tan and green). The Carthaginians took the center with their Cav and Light Horse on the flanks, while the Romans’ smaller army forced them to spread out to cover ground. They had the steep hill and vineyards to protect their flanks.
Carthage surged forward, slowed by Roman skirmishers until they were chased off. The Gallic Foot and Scutarii advanced, with the African Spear behind them in a second line. The big steep hill on the Roman left flank served to dissuade the Carthage flankers, so they shifted to the Roman right. The Romans responded with their Legions shifting to hold the low hill in the center and sending their Cavalry around on a long right flanking maneuver to help their Numidian Light Horse chase off the Gallic Cav and repositioned Carthage Numidians.
-

- The armies arrayed- Carthage on left, Rome on the right.
-

- The battle lines close.
-

- Getting closer.
-

- Roman Legions await the enemy on the low hill.
-

- Overhead of the armies right before the clash.
As usual I forgot to keep taking pictures toward the end of the battle. The Carthaginian line hit the Romans. Scutarii met the Italian Allied Spear, while the Gauls stormed up the hill to the Legions. The Italians lost a stand but held the line, while the Legions just straight out-rolled the Gauls, pushing them back. The Legion on the right side fought the Elephants, killing them with some truly bad rolls from the poor hephalumps. By the end Carthage lost the Gallic Cav, Balaeric Slingers, a unit of Numidian Light Horse, and the Elephants, and the Gallic Foot were teetering. Rome didn’t lose any full units, but their Numidian Light Horse and one unit of Velites were shaky.
Now that I’ve finished the 600 point forces, I can move on to expanding both armies to 800 points. More battles to come!